How to Customize STC APN For Android Users?
In the era of mobile connectivity, STC (Saudi Telecom Company) stands out as a leading provider in Saudi Arabia, securing a significant 40 percent market share. To optimize smartphone internet configuration, here’s a detailed breakdown for configuring STC APN Setting on Android.
As technology advances, the demand for optimal internet access also increases. STC, a telecommunications giant, addresses this demand with a user base of 20 million satisfied customers.
Here, we break down the essential steps for configuring STC APN settings on Android devices an easy approach suitable for everyone.
Applying the process to these specific smartphone models involves configuring APN internet settings and MMS settings to ensure optimal connectivity and multimedia messaging functionality.
Mobile Phone Models:
| Nokia | Xiaomi |
| Samsung | Huawei |
| LG | HTC |
| Alcatel | Lenovo |
| Asus | Honor |
| Motorola |
Let’s proceed with the configuration process step by step:
STC APN Setting Configuration:
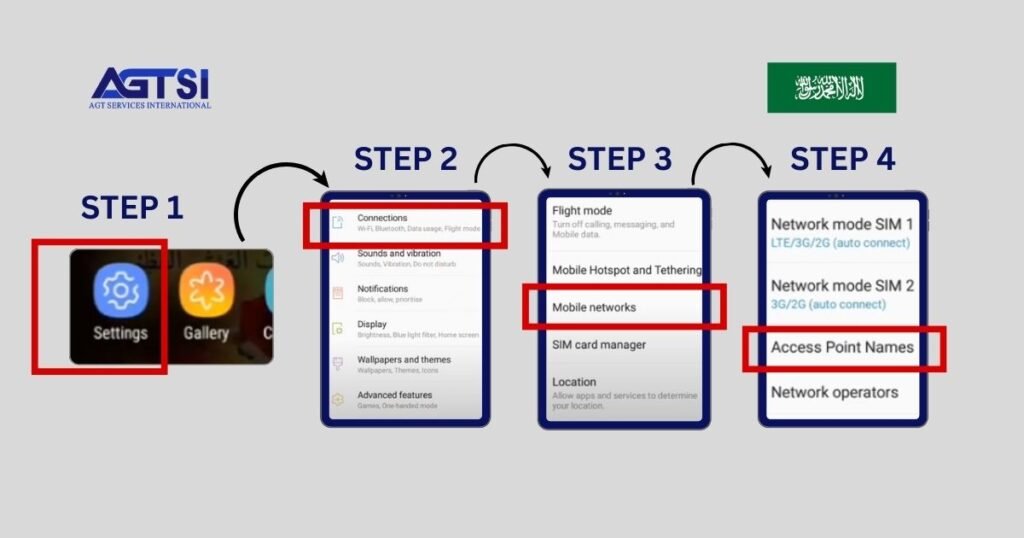
Here are the steps to configure your internet APN settings and enhance your internet speed.
- Access the “Settings” menu on your Android smartphone.
- Select “Connections/More” and tap on it.
- Select “Connections/More” and tap on it.
- Select the Access Point Names and further click on the ‘+’ icon to add a new APN.

KEEP READING:
Mobily APN Setting | Simplified Mobily Internet Setup
Zain APN Setting | Simplified Zain Internet Setup
STC Access Point Name Internet Settings:
| Name: | STC Internet |
| APN : | jawalnet.com.sa |
| Proxy: | Not Set |
| Port: | Not Set |
| Username: | Not Set |
| Password: | Not Set |
| Server: | Not Set |
| MMSC: | Not Set |
| MMS Proxy: | Not Set |
| MMS Port: | Not Set |
| MCC: | 420 |
| MNC: | 01 |
| Authentication Type: | Not Set |
| APN type: | Default |
| APN protocol/ APN roaming protocol: | Ipv4 |
For those requiring MMS APN settings, effortlessly configure your smartphone for multimedia messaging. Elevate your MMS experience with simple steps.
STC APN MMS Settings:
| Name: | jawal mms |
| APN : | mms.net.sa |
| Proxy: | Not Set |
| Port: | Not Set |
| Username: | Not Set |
| Password: | Not Set |
| Server: | Not Set |
| MMSC: | https://mms.net.sa:8002 |
| MMS Proxy: | 10.1.1.1 |
| MMS Port: | 9201 |
| MCC: | 420 |
| MNC: | 01 |
| Authentication Type: | Not Set |
| APN type: | Default |
| APN protocol/ APN roaming protocol: | Ipv4 |
If the issue persists, kindly reach out to their dedicated helpline at +966 11 455 5555 or visit the official website for expert assistance; their dedicated team of professionals is prepared to offer the assistance you require.
Keep Reading:
How to Transfer Balance from STC to STC:
How to Transfer Balance from Mobily to Mobily?
How to Easily Convert Zain or Mobily Number to STC
Final Thoughts:
Mastering the setup of STC APN settings on your Android device unlocks an ideal internet experience. Our user-friendly information ensures that both tech enthusiasts and those new to it can derive the process effortlessly. Stay connected, stay informed, and experience the advantages of having a properly configured STC APN on your device.
FAQs: (Frequently Asked Questions)
What are the SIM APN settings?
SIM APN settings are the configurations needed for your phone to establish a connection between your carrier’s mobile network and the internet. These settings define the pathway for all cellular data connectivity, and in some cases, you may be required to input them to activate your cellular service.
How do I configure STC Internet on my mobile device?
For Android devices:
Enable Wi-Fi on your device.
Choose the stcwifi network.
Your device will establish a direct connection to the STC network.
From the EAP Method list, choose SIM and click Connect.
Your device will automatically connect to the network in the future.
How do I change the APN settings on my SIM card?
Reset the Access Point Name (APN) settings to their default values using the following steps:
Navigate to Settings > Network & Internet.
Select a Mobile network (or Cellular networks in some instances).
Tap on Access Point Names.
Access the Menu.
Choose the option to Reset to default.


